
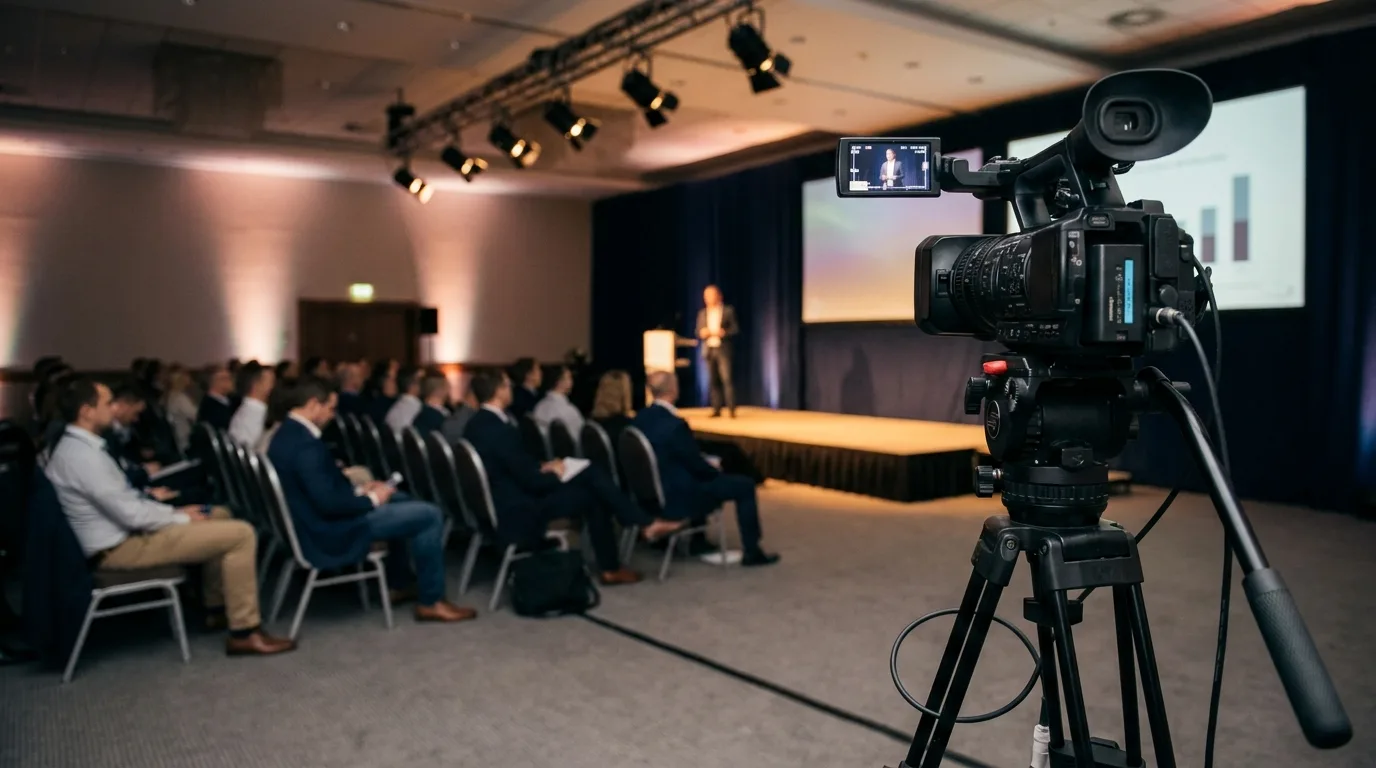
Speechbox / Production
The Capture Guide
Speechbox turns your session recordings into clips, quote cards and articles. This is what we need from you, which is less than most organizers expect, and how to get more out of the same shoot if you want to. Start with the first two pages. The rest is optional.
Start here
What we actually need from you
Files. One video file per session, with sound you can hear. That is the whole requirement. If you already record your sessions, you already have everything Speechbox needs, and you can stop reading here.
One video file per session
Stop and start the recording between talks, rather than leaving it running all day.
This is the only thing on the list that changes what your crew does, and it takes two button presses.
Audio you can hear
Whatever you already capture is a starting point. A line out from the sound desk is much better.
If you improve exactly one thing about your video this year, improve the sound.
The final agenda
Session times, session titles, and speaker names spelled correctly.
The names go straight onto the speaker kits, so a misspelling is public.
The parts that follow are how to get more out of the same shoot: stronger vertical clips, automatic speaker portraits, more usable moments per session. None of it is a condition of working together, none of it requires equipment you do not already have, and none of it changes what the event looks like in the room. Read what is useful and ignore the rest.
If you want to improve the result, in order of impact
| Effort | What to do | What it buys |
|---|---|---|
| Five minutes, free | Ask the AV company for a line out from the mixing desk into the camera. | Clean transcript, which drives every written asset |
| Sixty seconds, free | Frame the speaker, not the room. Head about a sixth of the frame width, in the centre. | Vertical clips and automatic speaker portraits |
| One sentence to the host | Ask the moderator to repeat audience questions into their microphone. | The question and answer segment becomes usable |
| One extra camera body | A second locked camera on a tight head and shoulders shot. | The largest single jump in clip quality |
If you read only one more page, read part five. It shows two real frames and the vertical clip each one actually produces.
Part one
What we do not need
This comes first on purpose. Most organizers assume session video means a production budget. It does not. None of the following changes what Speechbox produces, and every one of them is a line item somebody has quoted you for.
| B-roll of the sessions | Not used. Your roving videographer's footage is yours, for your own sizzle reel. |
| Colour grading | Not needed. A neutral, correctly exposed picture is better than a graded one. |
| Editing or assembly | Not needed. Raw session recordings are the input. |
| 4K | Welcome, not required. 1080p is the working standard. |
| Camera movement | Not needed. Locked off is genuinely fine, and often better. |
| Jib, slider, gimbal, drone | Not needed for session content. |
| A separate audio mix | Not needed. The room's PA mix is exactly right. |
| Burned-in lower thirds | Actively unhelpful. They survive into every clip at the wrong size and cannot be removed. |
Part two
What actually happens to your footage
Speechbox takes your finished session recordings and turns each one into a set of publishable assets: highlight clips in both widescreen and vertical, quote cards, social posts, an article, blog drafts, newsletters, a video description and a YouTube pack.
Every one of those clips is cut out of your frame. We do not reshoot, we do not add footage, and we do not invent picture that was never recorded. What your camera saw is what the clip shows.
A typical fifteen minute session produces around forty five generated assets, of which roughly six clips and eight quote cards are picked and delivered. Each picked clip ships in both shapes, so six chosen moments become twelve video files.
Measured across fifty real events: a seven minute talk yields about six clips, a sixty two minute talk yields about eight. Four hours recorded as one continuous file produces roughly fifty assets. The same four hours recorded as twelve separate sessions produces roughly five hundred and seventy. This single fact drives half the rules in this guide.
Three things decide whether any of it works. Can the audience hear it. Can the software find a face. Did each session arrive as its own clean file. Everything that follows is one of those three.
Part three
The five that matter most
These apply equally to a three hundred dollar rig and a thirty thousand dollar rig. If a crew reads nothing else, they should read this page.
Take audio from the sound desk, not from the camera
Ask the AV company for a line out from the mixing console into the camera's audio input. It is a five minute request at load-in and it usually costs nothing.
If you skip it: the camera microphone records the room instead of the stage. In an exhibit hall it records the exhibit hall. Unclear audio does not produce a worse clip, it produces no clip.
One file per session
Stop the recording between talks. A ten session day is ten files, named by session. Never one file for the whole stage day.
If you skip it: a six hour file is treated as one session and yields one session's worth of assets. It also means someone has to sit and cut it before anything can start.
While a person is speaking, keep them in frame
No cutaways to slides, to the audience, or to an empty stage during speech. If the moderator asks a question from off camera, either frame wide enough to include them or have them repeat it on stage.
If you skip it: a speaking voice with nobody on screen cannot be matched to a face, so those minutes produce no clip, and a speaker who is never on screen cannot have a speaker kit.
Record at 1080p or better
Full HD is the floor. 4K is welcome but not required. Constant frame rate, 25 or 30 fps, H.264 or H.265.
If you skip it: we never upscale. A 720p source produces 720p clips, and a vertical crop taken out of a 720p frame is smaller still.
Roll thirty seconds early and thirty seconds late
Start before the introduction and stop after the applause has died.
If you skip it: the best closing line in the talk is regularly the one that gets clipped off, and an opening that starts mid sentence cannot be used as a clip at all.
Part four
Audio is the decision, everything else is a preference
Picture quality changes how a clip feels. Audio quality changes whether there is a clip at all. Transcription drives the clip selection, the quote cards, the articles and the search visibility, and transcription is only as good as what the microphone heard.
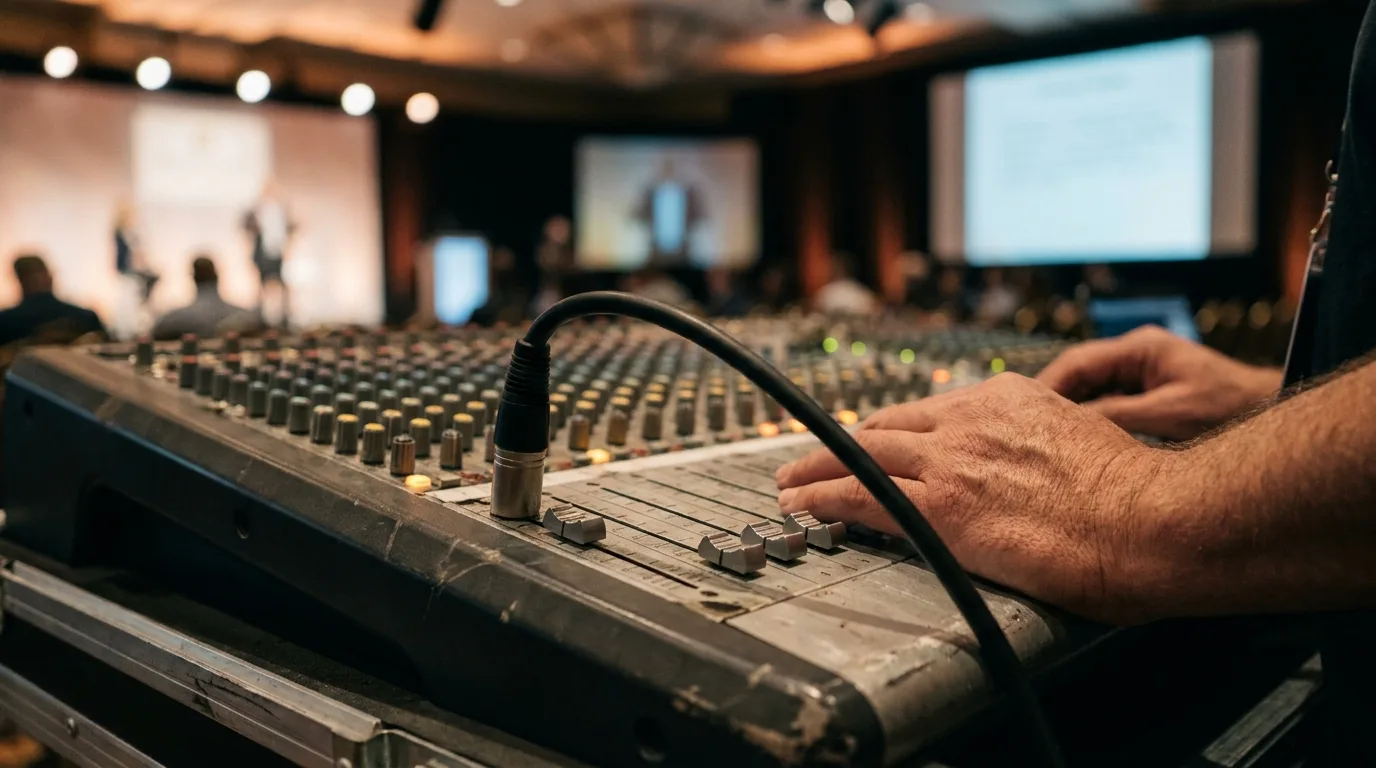
How to get the desk feed
The request to make at load-in: "Can we get a line out from the desk into our camera, and can we check levels during rehearsal."
Setting it
- Check levels during the rehearsal, not during the first talk. Peaks around minus twelve, never touching zero.
- Record a spoken test and listen back on headphones. Room hum, a buzzing ground loop and a dead channel all sound fine on a meter.
- If you have both, record the desk feed on one channel and a room microphone on the other. The room track carries the applause and the laughter, which makes the clips feel alive.
If someone asks a question from the floor without a microphone, it is not on the desk feed, it is not in the transcript, and the answer that follows it makes no sense on its own. Brief the moderator to repeat every audience question into their own microphone before answering. It costs nothing and it rescues the entire question and answer segment, which is often the most quotable part of a session.
A stage on an exhibit floor, a breakfast room with service running, and any space sharing a wall with a second session are the three rooms where audio goes wrong. In all three, the desk feed is not an improvement, it is the only thing that works. If the stage has its own small PA, that PA has an output. Ask for it.
Part five
Framing: you are shooting two shapes at once
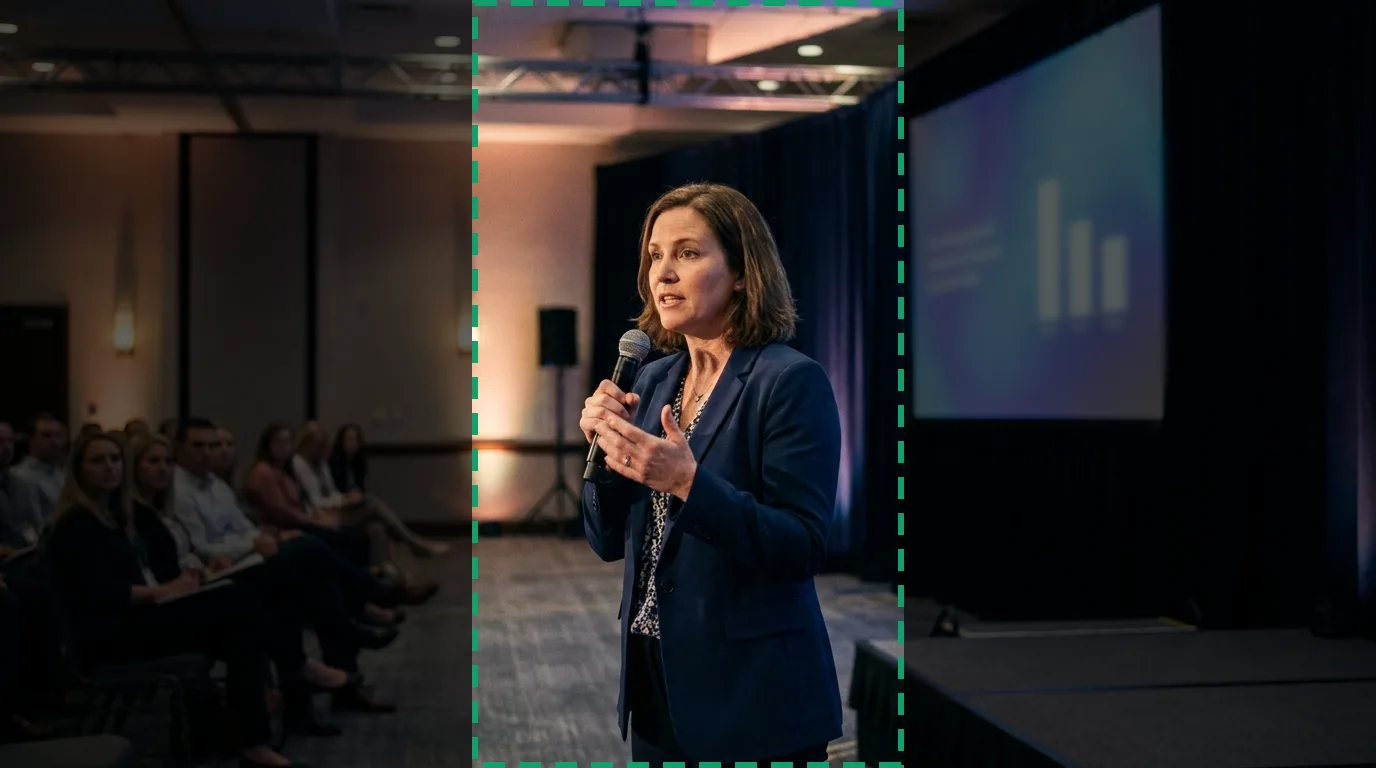
Every moment we pick ships twice, once widescreen and once vertical. The vertical version is cut from the middle of your horizontal frame, full height, nine by sixteen. Whatever sits in the outer thirds is thrown away.
The two examples below are real. The dashed box on the left is exactly the region that survives, and the tall image on the right is the actual clip produced from it.
Your frame, speaker centred
The vertical clip
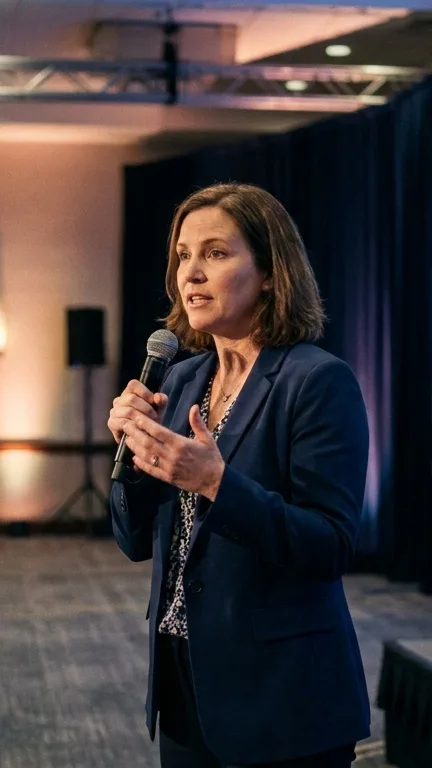
Works. She is inside the centre third, so the vertical clip is a complete, publishable portrait. The same frame also gives a clean widescreen clip. One camera position, two usable shapes.
Your frame, speaker at the edge
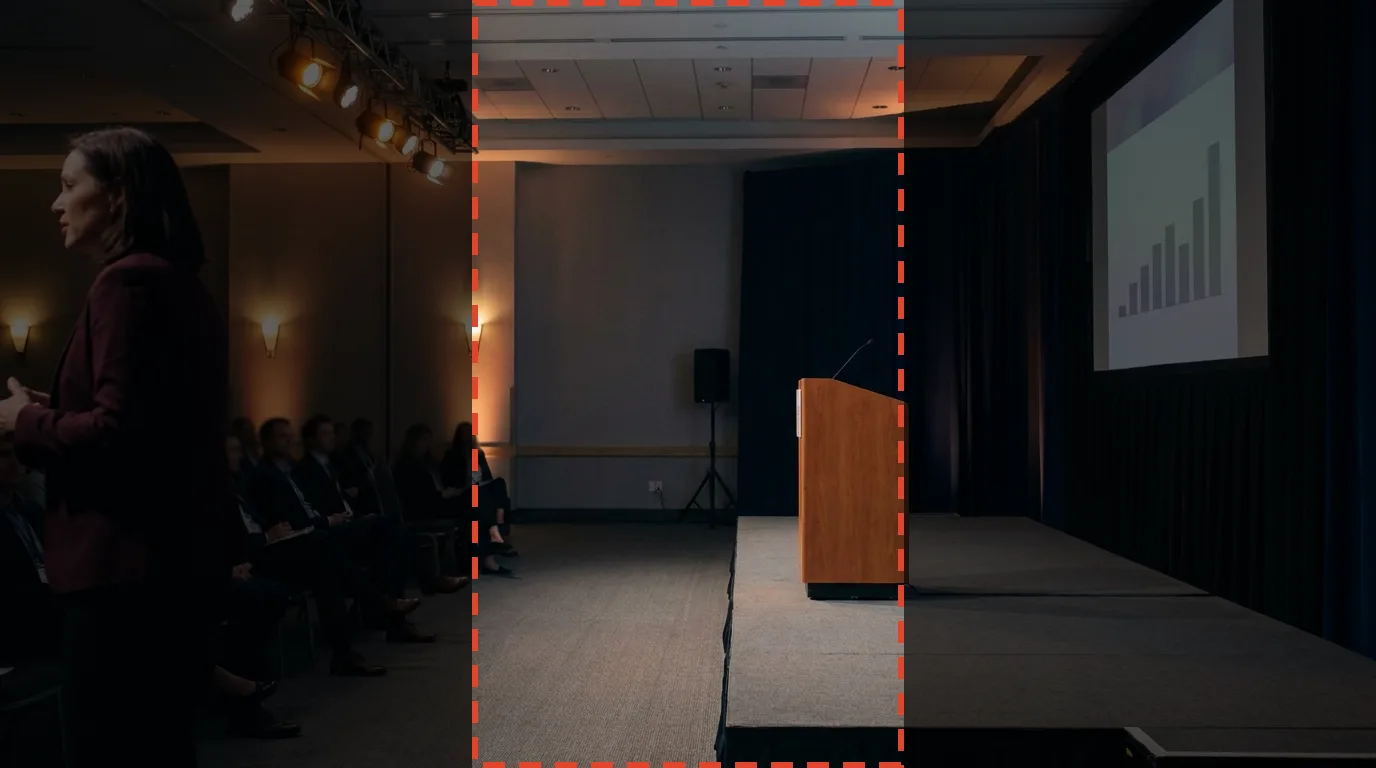
The vertical clip
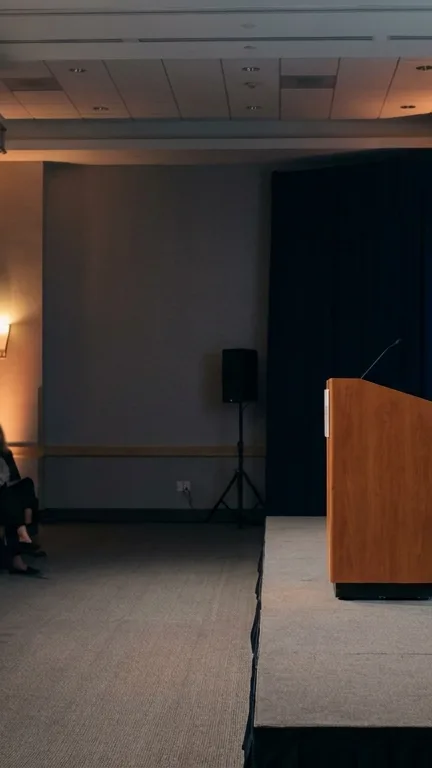
Fails. The talk was recorded, the audio is fine, and the vertical clip is a photograph of an empty lectern. Nothing downstream can fix this. It is decided the moment the tripod is set.
Not roughly central. Inside the middle third of the frame width, along with their gestures. If the stage design forces the speaker to one side, move the camera rather than accepting the composition.
Rule two: the face has to be big enough to find
Faces are located automatically so that each speaker gets their own kit with their own name and portrait. The working floor is a face at least five percent of the frame width. On a 1920 pixel wide frame that is a face about ninety six pixels across. Below that the face is dropped, and that speaker loses their portrait and their automatic name.
Five percent is the floor, not the target. Aim for the speaker's head to occupy twelve to twenty percent of the frame width. In plain terms, a medium shot: head and shoulders down to about mid chest.
Too wide
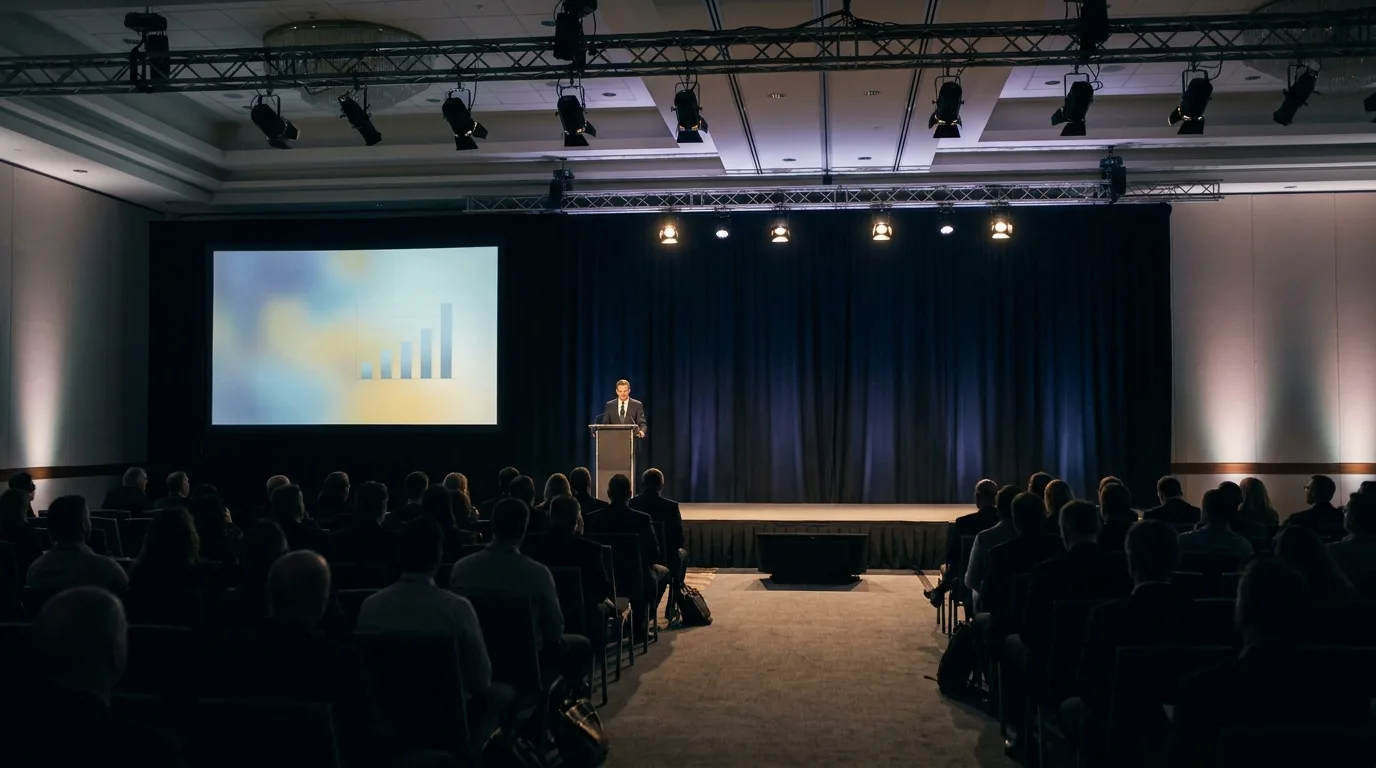
Face is roughly 2 percent of the frame width. Below the floor, so no portrait and no automatic name. The vertical crop of this frame is a curtain. Most of the picture is ceiling, empty stage and the backs of heads. This is the most common mistake in conference video, and it comes from framing the room instead of the person.
Aim here
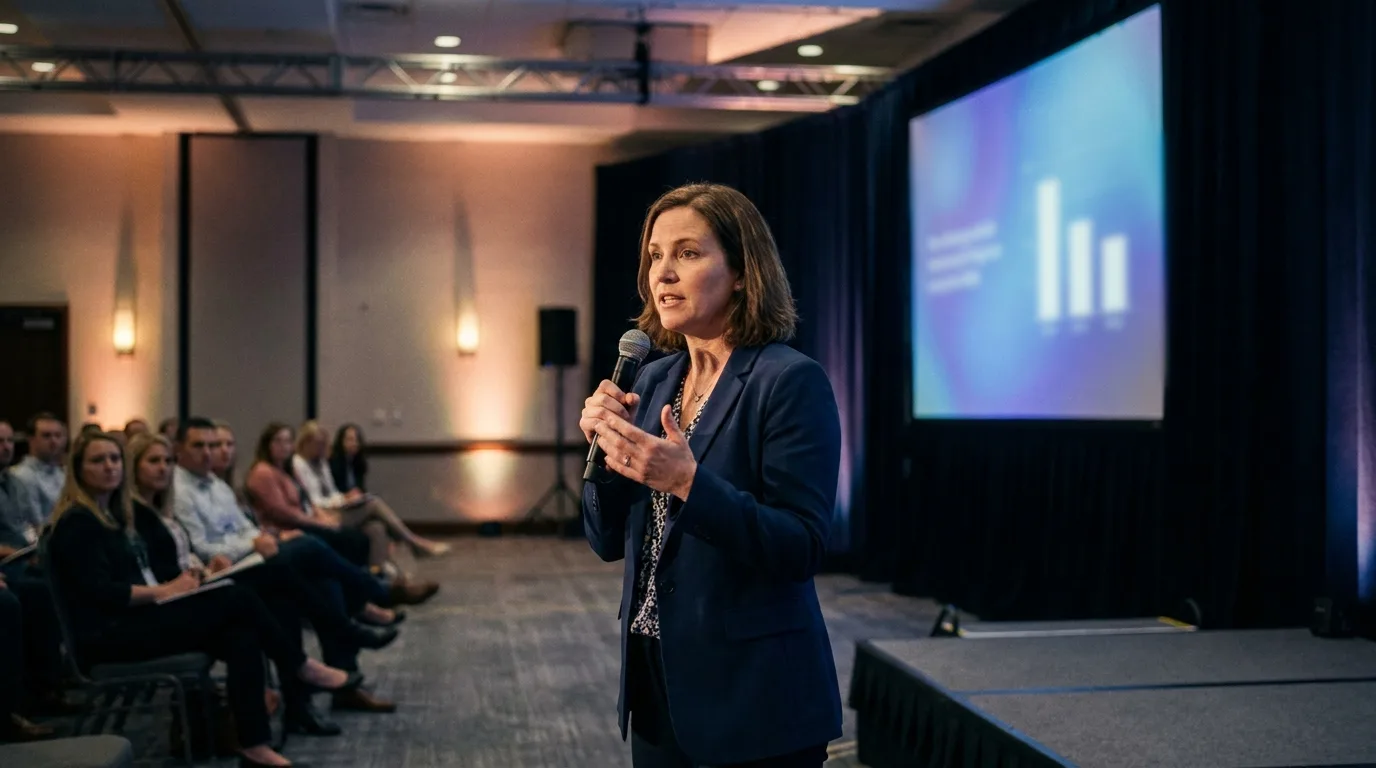
Face is roughly 14 percent of the frame width. Eyes near the upper third, modest headroom, speaker in the centre. Portrait found, name assigned automatically, and it crops to a strong vertical clip. This is the reference shot for the whole guide.
Careful: shooting over the audience
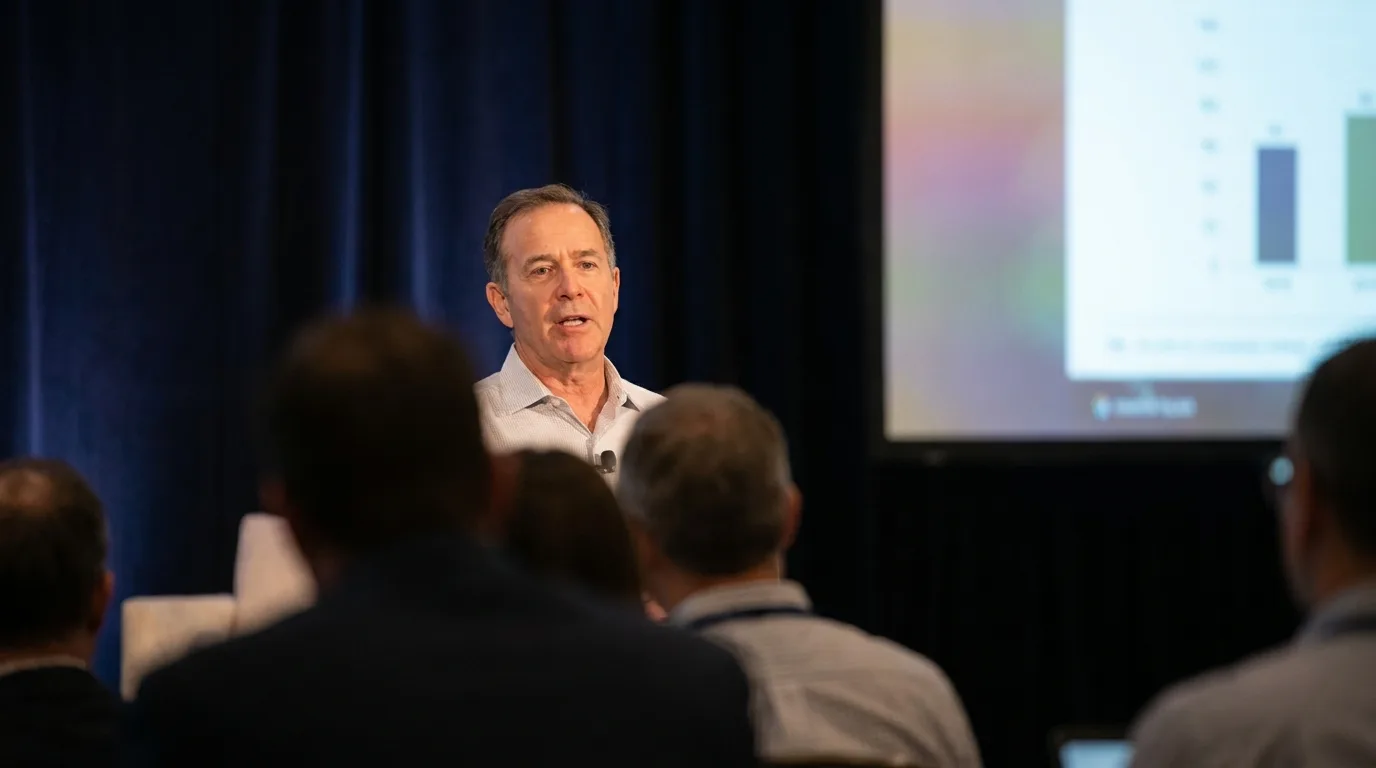
The face is a good size, but the bottom third of the frame is the backs of heads. Shooting from inside the seating costs you a third of the picture and puts moving obstructions in front of the speaker. Put the camera on a riser, or at the back on a raised tripod, so the lens clears the audience.
Rule three: headroom and eyeline
- Put the eyes on the upper third line of the frame.
- Leave a hand's width of headroom, no more. A large gap above the head becomes the entire top of the vertical clip.
- Leave a little room below the chin. A caption band is added there later.
- Do not burn in your own lower thirds, logos or tickers on the recorded camera. They survive into every clip, at the wrong size, and cannot be removed.
Setting a static camera properly
You do not need a camera operator. You need the shot set correctly once.
Do
- Frame for where the speaker will actually stand, not for the whole stage.
- If they will move, frame the width they will really use and stop there.
- Lock the pan and tilt on the tripod.
- Fix focus and exposure manually. A bright screen behind the speaker will otherwise make the camera hunt and turn the face into a silhouette.
- Set white balance to the stage lighting, once, at rehearsal.
Do not
- Include empty stage "just in case". Every unused pixel shrinks the face.
- Shoot from the extreme side of the room. A steep angle gives a profile, and a profile is a weak portrait and a weak thumbnail.
- Shoot from below with the lens pointing up at the ceiling lights.
- Frame the presentation screen and the speaker equally. The screen is not the content, the person is.
Where to put the camera
Centre line, lens roughly at the speaker's head height, close enough that the head fills at least a tenth of the width. If the room forces you off centre, go off centre by a little, not by a lot.
Part six
Panels, fireside chats and speakers who move
Speakers are matched to faces automatically so each one can have their own kit. That matching is reliable up to three people on camera. Above three it needs a human pass, which we can do, but the shot still has to give us something to work with.
Three panellists, cropped to the chairs
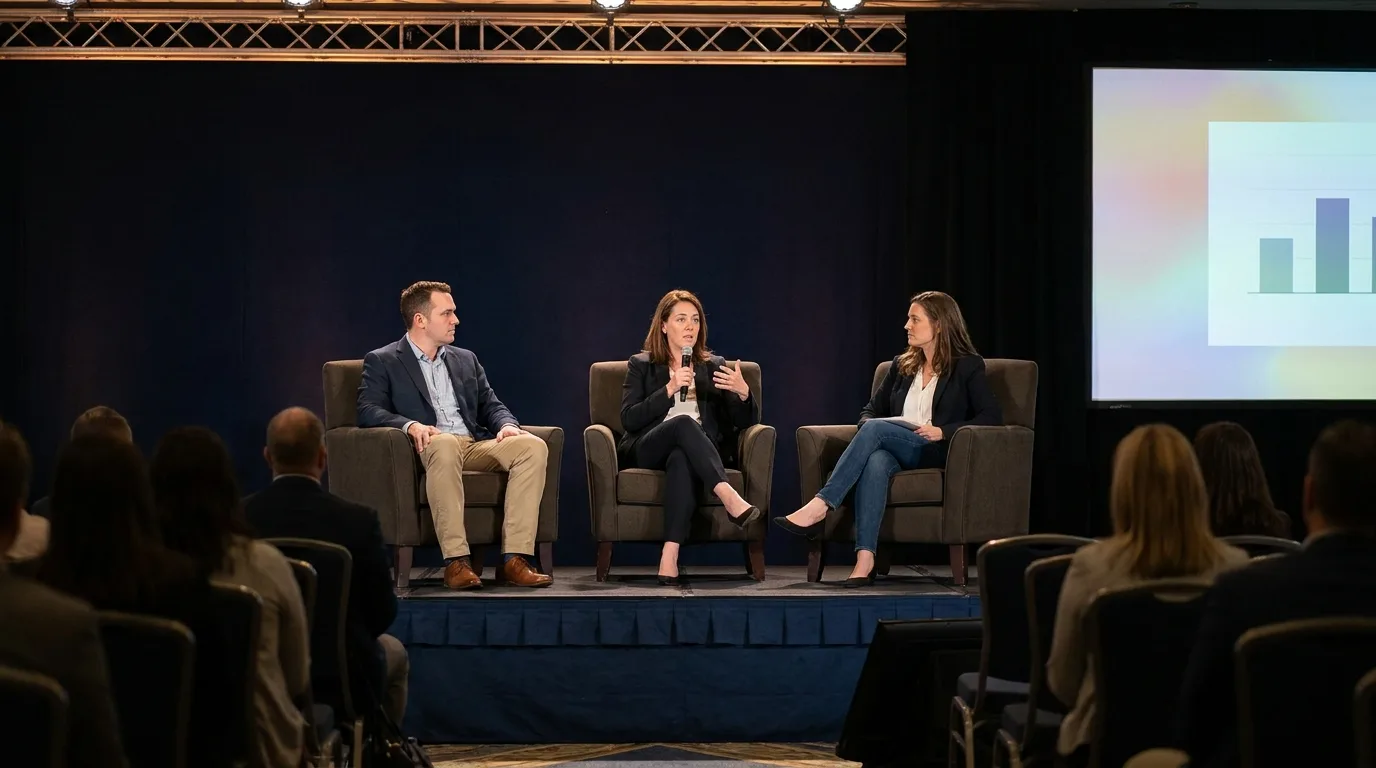
All three faces are well above the floor and each one is identifiable. Every panellist you choose can have their own kit, with their own portrait matched automatically.
Five panellists, framed from the back of the room
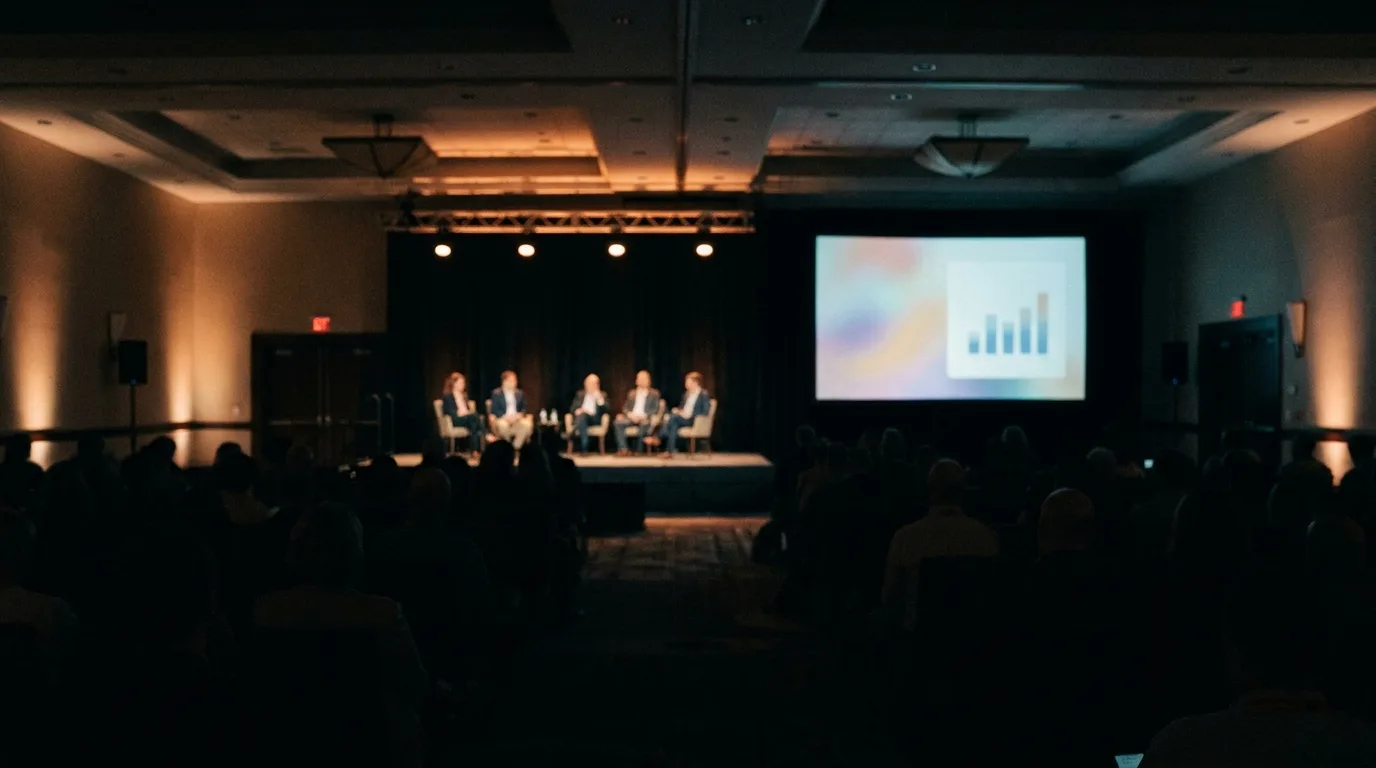
Each face is under two percent of the frame width. No portraits, no automatic names, and no vertical clip is possible from this angle. The talk still transcribes, so you keep the articles and the quote cards, but the video assets are lost. This is the single most common way a good panel becomes unusable.
| On camera | What to shoot | What you get |
|---|---|---|
| One speaker | One medium shot on the speaking position. Nothing else needed. | Fully automatic |
| Two, fireside chat | One shot holding both, tight enough that each face clears the floor comfortably. Do not centre on the empty space between them. | Fully automatic |
| Three, panel | One shot holding all three, cropped to the chairs. Cut the empty stage either side. | Fully automatic |
| Four or five, panel | Best: a second camera holding singles or pairs. Acceptable: one shot cropped hard to the row of chairs, faces still above the floor. | Names assigned by hand from your agenda |
| Moderator off stage | Either include them in the frame, or accept that their questions produce no clip. Their voice will still be in the transcript. | Partial |
The speaker who walks the stage
Framed wide to contain the walk
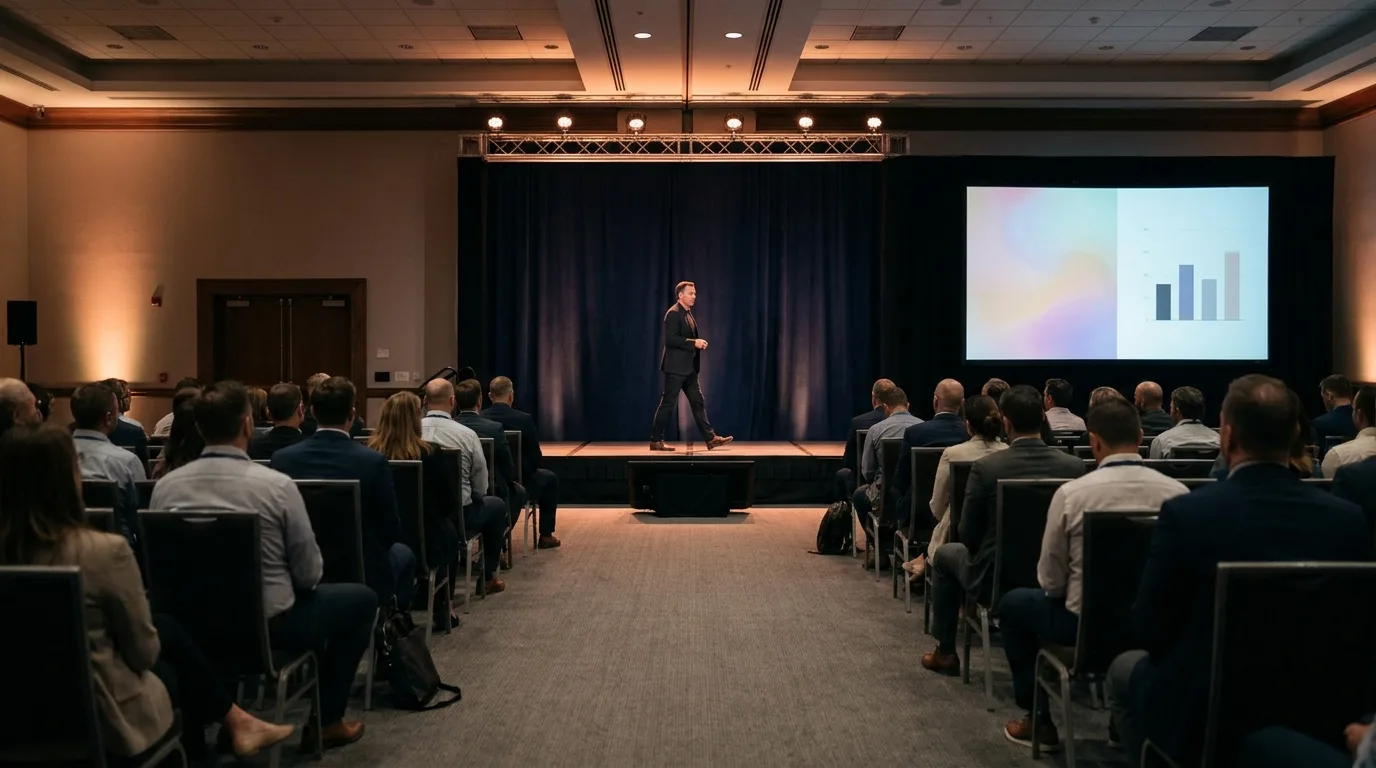
A roaming presenter forces the frame wide enough to hold the whole walking path, and the face pays for it. Two fixes, both cheap. Put a second camera on a tight shot. Or ask the speaker at rehearsal to deliver from the marked position. Most will, once you tell them it is what puts them in the highlight reel.
Part seven
Slides, graphics and the program feed
Full screen slides are the second most common way footage is spoiled, after audio.
The camera has left the speaker
Someone is talking over this, and there is nobody on screen. Those minutes produce no clip. If it happens in the opening minutes it can cost that speaker their automatic identification for the whole session: in one of our own tests a full screen title card covered two of three sampling windows and did exactly that.
- Keep the camera on the human, always. If the audience needs the slides, that is a second source, and we composite the two afterwards.
- Slides in the background are fine and often good. A speaker in the foreground with a legible screen behind them is a strong shot, as long as the exposure is set for the face and not for the screen.
- Send us the slide deck as a file if there are charts or numbers you want on screen in the clips. That is far better than a camera pointed at a projector.
- Intros and outros are welcome but optional. If your crew already adds a branded top and tail, keep doing it. If not, we handle branding ourselves.
Part eight
What each rig actually gets you
This is the part organizers most want an honest answer to. Here it is: the entry level rig is enough. What separates a good result from a poor one is audio and framing, not budget.
One locked camera and a line from the desk
One camera on a tripod, one audio cable, no operator. Often already in the room.
You get: full widescreen highlight clips, quote cards, all written assets, the full transcript, the searchable session page and a complete speaker kit for every speaker you choose (how to count them). Vertical clips too, provided the shot is framed medium rather than wide.
You do not get: angle changes, cutaways, or a broadcast look. The clips are one continuous angle with motion graphics and captions on top.
Verdict: this is the sensible starting point, and it is what most of the footage we work with looks like.
Two cameras: a locked wide and a locked tight
A second camera, still no operator. One holds the full stage, one holds a tight head and shoulders.
Adds: genuinely strong vertical clips cut from the tight camera, angle changes that make a long session watchable, and a reliable portrait for every speaker. It also covers the roaming presenter and the four person panel.
Verdict: the biggest single upgrade available, and it is one extra camera body.
Operated multi-camera with a program feed
Two or more operated cameras, a vision mixer, a recorded program output plus isolated camera recordings.
Adds: a broadcast look and reaction shots.
Important: if you cut a program feed, please also keep the isolated recordings. A program feed that cuts to slides and audience shots is harder for us to work with than a single locked camera that never leaves the speaker.
Verdict: worth it when the event's own brand demands it. Not required for the assets.
Part nine
Delivering the files
File names
One file per session, named so that anyone can identify it without opening it:
Date, stage, start time, speaker surname, short session title. Hyphens instead of spaces. If the file name is right, nothing else about the handover can go wrong.
Technical specification
| Item | Requirement |
|---|---|
| Container | mp4 preferred. mov, m4v, mkv, webm and avi are all accepted. |
| Codec | H.264 or H.265. Constant frame rate, 25 or 30 fps. Avoid variable frame rate phone recordings. |
| Resolution | 1920 x 1080 minimum. 4K welcome. We never upscale, so the source sets the ceiling. |
| Audio | 48 kHz, stereo or mono, from the desk. If you have a separate WAV from a recorder, send it alongside. |
| File size | 6 GB maximum per file. Over that, export at a lower bitrate rather than splitting the session. |
| Transfer | A shared drive link, or direct upload. Whatever your crew already uses. |
Send with the footage
- The final agenda with exact session start times, session titles, and every speaker's full name spelled correctly, with job title and company. Names go on the speaker kits, so a misspelling is public.
- Event logo in PNG with a transparent background.
- Brand colours as hex codes.
- Speaker headshots if you already collected them for the website. Optional, but they make a better kit than a frame grab.
Branding, styling and the asset templates are built before the event so that everything is ready the moment the footage arrives. Three weeks of lead time is what makes same week delivery possible afterwards.
If you want assets during the event
Optional, and it changes nothing about how you shoot. Your crew streams the stage to an unlisted YouTube Live channel, usually straight out of OBS, and assets start appearing while the session is still running. It needs a wired network connection at the stage position, which is worth confirming with the venue at contracting rather than at load-in. Sending files after the event works identically, just later.